In the digital age, the way we present our written content plays a crucial role in how it is perceived. Whether you are drafting a formal report, crafting a creative story, or preparing a presentation, the margins of your document can significantly impact its appearance. By learning how to change margins on Google Docs, you can ensure that your document not only looks professional but is also tailored to your specific needs. This article will guide you through the steps necessary to adjust margins, offering tips and tricks to enhance your document’s layout.
Google Docs is a versatile tool that allows users to create, edit, and collaborate on documents from anywhere. However, many users are unaware of the various formatting options available to them, including how to change margins on Google Docs. Margins dictate the amount of white space surrounding your document's text, which can affect readability and overall presentation. By mastering this feature, you can elevate the quality of your documents and make them more visually appealing.
Ultimately, understanding how to change margins on Google Docs can empower you to create documents that not only meet your standards but also leave a lasting impression on your readers. In this article, we will explore the different methods to adjust margins, the importance of proper formatting, and tips to ensure your document stands out. Whether you are a student, a professional, or someone who frequently writes, this guide is designed for you.
What Are Margins and Why Are They Important?
Margins refer to the blank space surrounding the text in a document. They play a vital role in the overall layout and readability of your written content. Properly set margins can help to:
- Create a balanced and professional look
- Enhance readability by preventing text from appearing crowded
- Allow space for notes or comments, particularly in collaborative documents
How to Change Margins on Google Docs?
Changing margins in Google Docs is a straightforward process. Here’s a step-by-step guide to help you adjust your margins effectively:
Step 1: Open Your Document
Begin by opening the Google Docs document where you wish to change the margins.
Step 2: Access the Page Setup Menu
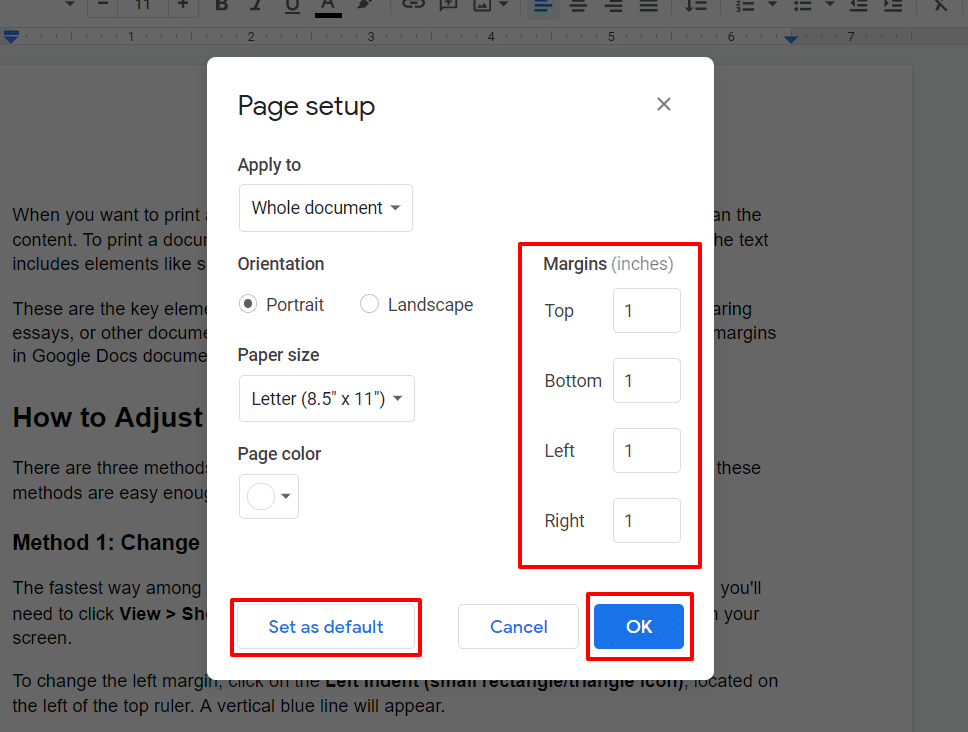
Navigate to the top menu and click on "File". From the dropdown menu, select "Page setup". This will open a new dialogue box.
Step 3: Adjust the Margins
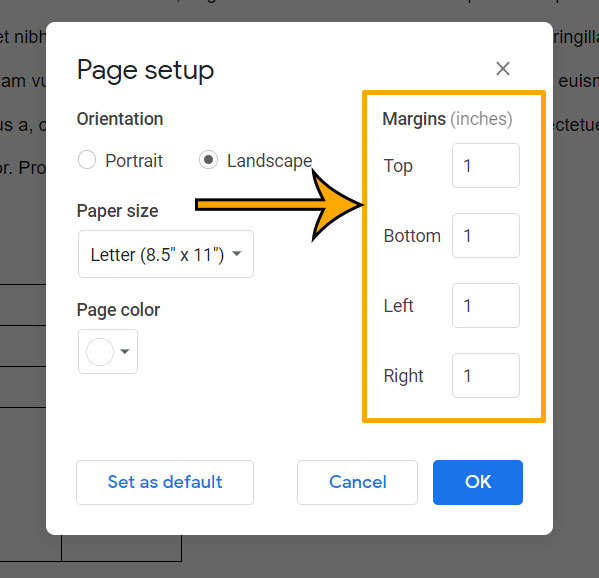
In the Page setup dialogue box, you will find options to set the margins for the top, bottom, left, and right sides of your document. Enter your desired measurements in inches.
Step 4: Apply Changes
Once you have made your adjustments, click "OK" to apply the changes. Your document will now reflect the new margin settings.
Can I Set Custom Margins in Google Docs?
Yes, Google Docs allows you to set custom margins. By following the steps outlined above, you can enter specific measurements that suit your document’s needs. This feature is particularly useful for creating documents that require unique formatting, such as resumes or academic papers.
How to Change Margins on Google Docs Using Ruler?
An alternative method to change margins is by using the ruler located at the top of the Google Docs interface. Here’s how:
Step 1: Enable the Ruler
If the ruler is not visible, go to the "View" menu and ensure that "Show ruler" is checked.
Step 2: Adjust the Margins
Click and drag the blue triangle markers on the ruler. The left marker adjusts the left margin, while the right marker adjusts the right margin. You can also adjust the top and bottom margins by dragging the top and bottom markers.
What Are the Default Margin Settings in Google Docs?
The default margin settings in Google Docs are typically set to 1 inch on all sides. However, users can easily modify these settings to better fit their document requirements. Understanding these default settings is crucial for anyone looking to maintain consistent formatting across multiple documents.
How to Save Custom Margin Settings as Default?
If you frequently use specific margins, you can set them as default for all future documents. Here’s how:
Step 1: Open the Page Setup Menu
As mentioned earlier, access the "Page setup" menu from the "File" menu.
Step 2: Set Your Desired Margins
Input your custom margin settings in the dialogue box.
Step 3: Set as Default
In the same dialogue box, click on the option that says "Set as default". This will ensure that every new document you create will have these margin settings applied automatically.
Tips for Effective Margin Management
To make the most of your margin settings, consider the following tips:
- Always preview your document before finalizing the margins.
- Adjust margins according to the type of document; for instance, academic papers often require specific margin measurements.
- Utilize the ruler for quick adjustments when editing your document.
- Consider the readability of your document; wider margins can enhance the reading experience.
Conclusion
Learning how to change margins on Google Docs is an essential skill for anyone looking to create polished and professional documents. By following the simple steps outlined above, you can tailor your margins to suit your specific needs, enhancing the overall presentation of your work. Remember, effective document formatting not only improves readability but also helps convey your message more clearly. So, take the time to adjust those margins and elevate the quality of your written content!
Unmasking The Talents: Actors On Banshee
Keri Russell: A Glimpse Into The Lives Of Her Parents
Cindy Lou Who: The Journey From Whoville To Reality
![How to Change All Margins in Google Docs [FAQ]](https://i2.wp.com/lh6.googleusercontent.com/ExTZ3MQn28pfm1e4KgZFKyi4Iq62DPkDLL7F5ys8V4ClU7ssuQGnodKSXA_CYRBJHYRQpLYYk8M3xXzA9VtFnxsEVmOk2KVjwzK2QcIiEp2SI6mD8nAPW_j21cb9j5OJZJqu7ok7)
